

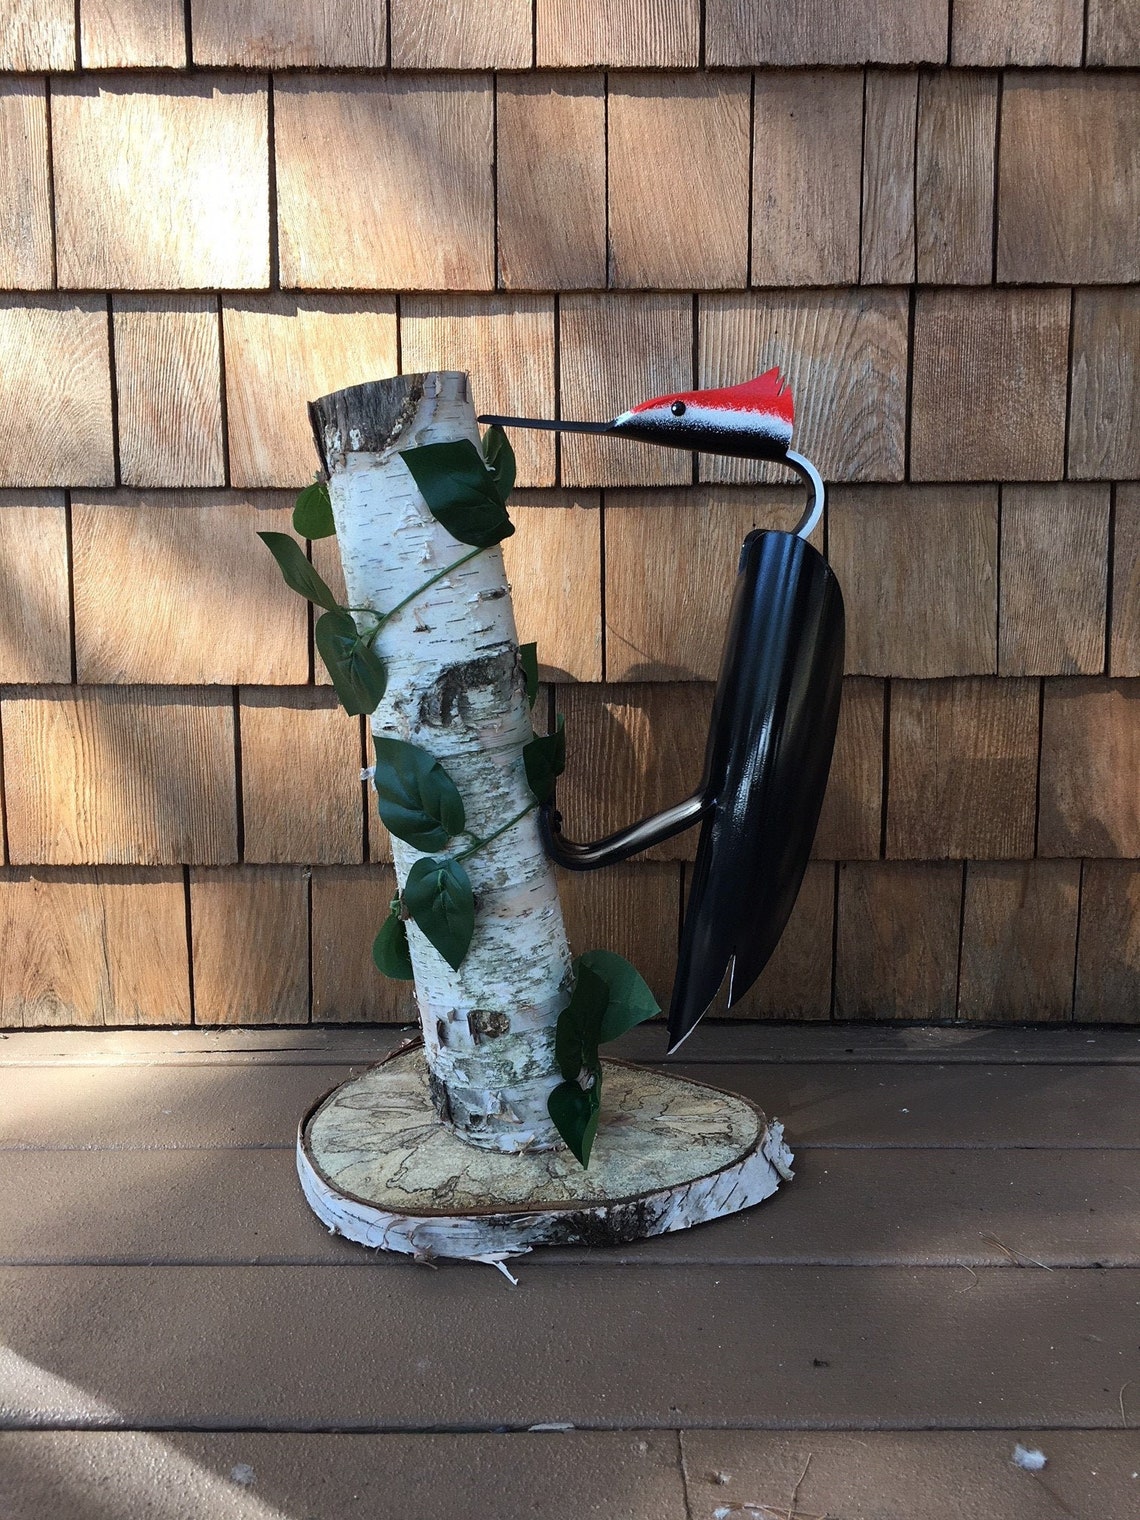
Have you ever wondered how to bring nature into your living space while unleashing your creativity? Consider crafting your own PVC bird from a simple but beautiful project. Making a PVC woodpecker might just be the ideal way to go about it, and it’s as simple as 1-2-3.
A simple PVC pipe can be transformed into a stunning woodpecker sculpture by simply making a few simple adjustments. Crafting has never been easier with this step-by-step guide, which will reveal the secrets to creating a lifelike woodpecker using materials that are easily available. By following this article, you’ll learn everything you need to know about choosing the right PVC pipes, painting intricate details, and determining the proper PVC pipe.
As you embark on this artistic journey, visualize the charm your PVC woodpecker will bring to your home. This artwork embodies your artistic talent in its vibrant colors, intricate details, and the satisfaction of displaying it. You’ll have everyone talking when you show them how to make your PVC woodpecker, which captures the essence of nature and craftsmanship. Let’s get into the world of DIY artistry, and you can see your room transform with the addition of a handcrafted PVC woodpecker.
Materials Needed
When venturing into the captivating world of crafting a PVC woodpecker, the selection of materials becomes the cornerstone of your artistic endeavor. Gathering the essential components ensures a seamless and enjoyable creative process. Here’s an exhaustive list of the materials needed, each playing a crucial role in bringing your envisioned PVC woodpecker to life:
PVC Pipes (Various Sizes)
- The backbone of your project, PVC pipes in various sizes allow you to customize the dimensions of your woodpecker. From the body to the tail, the versatility of PVC pipes is your sculpting clay.
PVC Pipe Connectors
- Connecting the dots, or rather, pipes! These connectors facilitate the assembly of different segments, providing stability and structure to your woodpecker. Opt for quality connectors to ensure durability.
PVC Pipe Cutter
- Precision is key when it comes to cutting PVC pipes. A reliable PVC pipe cutter ensures clean, accurate cuts, making the assembly process smoother. It’s your sculptor’s chisel, shaping the raw material into your envisioned masterpiece.
PVC Glue
- The glue that binds it all together! Choosing a robust PVC glue ensures a secure and lasting connection between the pipes and connectors. It’s the adhesive that transforms individual elements into a cohesive whole.
Sandpaper
- Smooth things out with sandpaper! Achieve a polished finish by sanding the edges of your PVC woodpecker. This step not only enhances the aesthetic appeal but also ensures a safe and splinter-free final product.
Acrylic Paint
- Now comes the fun part – adding color and personality! Acrylic paint offers a vibrant palette for expressing your creativity. Whether you opt for realistic tones or bold, imaginative hues, acrylic paint brings your woodpecker to life.
Paintbrushes
- The artist’s tools of the trade! Select a variety of paintbrushes for different strokes and details. From broad strokes on the body to intricate patterns on the feathers, the right brushes elevate your artistic expression.
Eye Protection
- Safety first! Shield your eyes from potential hazards during the cutting and sanding phases. Investing in reliable eye protection ensures a worry-free crafting experience.
Woodpecker Template (Optional)
- For those who prefer a guide, a woodpecker template acts as a reference point. While optional, a template can streamline the shaping process, ensuring your woodpecker closely aligns with your artistic vision.
As you embark on this creative journey, consider these materials not as mere supplies but as the building blocks of your artistic expression. The interplay between PVC pipes, connectors, glue, and paint is the symphony that transforms your vision into a tangible and visually striking PVC woodpecker. Embrace the craftsmanship, revel in the process, and witness the transformation of basic materials into a captivating work of art.
Planning Your Woodpecker
Embarking on the journey of crafting a PVC woodpecker demands meticulous planning, akin to an artist sketching the outlines before bringing the canvas to life. Here, we delve into the pivotal phase of planning, unraveling the steps that transform a vision into a tangible masterpiece.
Selecting the Size and Shape
The very essence of your PVC woodpecker lies in its size and shape, dictating its presence and visual impact. Consider these key points as you embark on this crucial decision-making process:
Consider Your Space: Evaluate where your woodpecker will find its perch. A larger outdoor space might accommodate a more substantial sculpture, while a compact indoor setting may call for a smaller, more intricately detailed creation.
Balance and Proportion: Strive for a harmonious balance in size and proportion. The head, body, and tail should coalesce seamlessly, creating a visually appealing and lifelike rendition.
Expressive or Realistic: Determine the vibe you’re aiming for. Are you leaning towards a whimsically expressive woodpecker, or do you prefer a more realistic representation? The size and shape contribute significantly to the overall aesthetic.
Creating a Blueprint or Template
With a vision in mind, translating it into a tangible blueprint or template serves as your roadmap to a successful PVC woodpecker. Here’s why this step is imperative:
Precision in Execution: A blueprint acts as your guide, ensuring precise measurements and angles. It aids in accurately translating your vision onto the PVC pipes, minimizing errors in the cutting and assembling stages.
Customization Possibilities: Whether you sketch it freehand or utilize digital tools, a blueprint allows you to experiment with different design elements. Tailor the template to your preferences, ensuring your woodpecker aligns with your artistic vision.
Efficiency in Assembly: Think of the template as a set of instructions. It expedites the assembly process, reducing guesswork and streamlining the creation of your woodpecker’s structural foundation.
Identifying Key Features (Head, Body, Tail)
The devil is in the details, especially when it comes to crafting the distinct features that define a woodpecker. Here’s why identifying key features is a pivotal aspect of your planning phase:
Realism vs. Creativity: Determine the balance between realism and creativity in your woodpecker’s features. While capturing the essence of a woodpecker’s head, body, and tail, don’t shy away from injecting your artistic flair to make it uniquely yours.
Feathered Details: Delve into the specifics of the woodpecker’s head and tail feathers. Consider how you’ll emulate these features using the PVC pipes – perhaps through strategic cuts or additional attachments to capture the feathered effect.
Structural Integrity: As you identify key features, keep structural integrity in mind. Ensuring that the head is proportionate to the body and the tail feathers are well-supported contributes not only to the aesthetics but also to the stability of your final creation.
In the planning stage, precision is your ally. The size, shape, blueprint, and features are the cornerstones that set the trajectory for a successful PVC woodpecker project. By investing time and consideration into this phase, you pave the way for a seamless transition from vision to reality, making each subsequent step a gratifying brushstroke in your artistic journey.
Cutting and Preparing PVC Pipes

In the intricate dance of transforming PVC pipes into a work of art, the phase of cutting and preparing is the ballet’s grand pas de deux. This is where precision meets creativity, and the raw materials take shape with careful consideration. Let’s delve into the crucial steps involved in this delicate process:
Measuring and Marking the Pipes
Accuracy is Paramount: Before the hum of the PVC pipe cutter echoes, meticulous measurement is the unsung hero. Precision here ensures that each segment aligns seamlessly, creating the foundation for a well-proportioned woodpecker.
Marking for Clarity: Using a contrasting marker, mark the measured points on the PVC pipes. Clear and distinct markings serve as your guide during the cutting process, minimizing the margin for error and streamlining the overall assembly.
Using a PVC Pipe Cutter Safely
Mastering the Tool: The PVC pipe cutter is your sculptor’s knife, and mastering its usage is paramount. Ensure you are well-acquainted with the tool’s mechanics, maintaining a firm grip and a steady hand for precise cuts.
Safety First: Don’t let familiarity breed complacency. Prioritize safety by wearing protective gear, including gloves and safety glasses. This not only shields you from potential harm but also enhances your confidence in wielding the cutter with finesse.
Smooth and Controlled Cuts: The key lies in the execution. Employ a smooth, controlled motion when using the PVC pipe cutter. A steady hand and a measured pace result in clean, accurate cuts, elevating the overall quality of your woodpecker’s structure.
Sanding the Edges for a Smooth Finish
Finishing Touches Matter: The journey doesn’t end with the cut; it extends to the finishing touches. Sanding the edges is akin to refining the rough edges of a gem. This step not only enhances the aesthetic appeal but also ensures a safe and polished final product.
Embrace Various Grits: Start with a coarser grit to eliminate any protrusions or uneven surfaces. Progress to finer grits for a smoother finish. This tiered approach imparts a professional touch, making your woodpecker not just visually pleasing but also tactilely satisfying.
Attention to Detail: Don’t rush the sanding process; let patience be your guide. A keen eye for detail ensures that each edge is smooth to the touch, and potential splinters are mitigated. This attention to detail elevates your PVC woodpecker from a DIY project to a true work of art.
In the realm of crafting a PVC woodpecker, cutting and preparing the PVC pipes is the pivotal act where imagination becomes tangible. As you measure, cut, and refine, envision the metamorphosis of raw materials into a masterpiece. This phase requires not just technical skill but also an artistic eye, marrying precision with creativity. Embrace the dance of creation, and with each cut, witness your woodpecker taking flight into the realm of artistic expression.
Assembling the Body
In the symphony of crafting a PVC woodpecker, the assembly of its body is the crescendo, where individual components harmonize to create a cohesive and visually captivating whole. This stage is a ballet of precision, as each step contributes to the structural integrity and aesthetic allure of your masterpiece.
Connecting the Pipes using PVC Connectors
Choosing Quality Connectors: The backbone of your woodpecker lies in the connectors that seamlessly link the PVC pipes. Opt for high-quality connectors to ensure a robust and enduring connection. This not only enhances stability but also extends the lifespan of your creation.
Strategic Placement: Deliberate on the placement of connectors. Whether you’re attaching the head to the body or extending the tail, strategic positioning ensures a fluid and natural flow. This step is akin to the skeletal structure, providing the foundation for the body’s artistic form.
Secure and Snug Fit: The success of your woodpecker’s assembly hinges on the connectors’ snug fit. A secure connection not only prevents wobbling but also contributes to the overall durability. Think of it as the glue that binds your creation together.
Building the Core Structure
Layering for Dimension: Like a sculptor shaping clay, layering the PVC pipes builds the core structure of your woodpecker. Consider the body’s contours and the dynamic pose you envision. This step transforms your creation from a mere assembly of pipes into a three-dimensional work of art.
Balancing Act: Achieving balance is not just about stability; it’s about visual harmony. Distribute the weight evenly to prevent tilting or toppling. A well-balanced woodpecker not only stands proudly but also draws the viewer’s eye with its poised stance.
Refining Details: As you build the core structure, pay attention to the finer details. Ensure that each pipe aligns seamlessly with the blueprint, capturing the essence of a woodpecker’s body. This meticulous approach elevates your creation from a basic assembly to a true representation of avian artistry.
Ensuring Stability and Balance
Testing Ground: Before declaring victory, test your woodpecker on a stable surface. This is the litmus test for stability and balance. A level placement ensures that your creation not only stands confidently but also becomes an eye-catching focal point in any setting.
Weather-Resistant Considerations: If your woodpecker finds a home outdoors, factor in weather-resistant elements during the assembly. Utilize appropriate materials and adhesives to withstand the elements, ensuring longevity and resilience against the forces of nature.
Finesse in Adjustments: If adjustments are needed, approach them with finesse. Minor tweaks can make a significant difference in stability. Consider these adjustments as the final brushstrokes, refining your woodpecker until it embodies the envisioned grace and equilibrium.
In the art of assembling the body, precision and artistry converge. Each connected pipe, strategically placed connector, and the carefully balanced core structure contribute to the transformation of PVC into a captivating woodpecker sculpture. As you navigate this phase, envision not just an assembly of pipes but a living testament to your creative prowess – a PVC woodpecker ready to perch in the realms of artistic expression.
Shaping the Head
In the intricate dance of crafting a PVC woodpecker, the artistry of shaping the head emerges as a pivotal act. This phase is a delicate balance between form and detail, where the essence of the woodpecker’s character takes flight through the manipulation of PVC pipes.
Forming the Woodpecker’s Head with PVC Pipes
Sculpting with Precision: As you embark on forming the head, envision it as a sculptor molding clay. The PVC pipes become your medium, and precision is your guiding principle. Consider the size and proportion relative to the body, ensuring a seamless transition that captures the distinct silhouette of a woodpecker.
Fluid Contours: The beauty lies in the fluid contours of the head. PVC pipes, when manipulated with finesse, can emulate the gentle curves and distinctive shape of a woodpecker’s cranium. This step lays the foundation for a visually compelling representation, marrying realism with artistic interpretation.
Referencing the Blueprint: The blueprint you created becomes your trusted guide in this artistic endeavor. Referencing it regularly ensures that your sculpting aligns with the envisioned size and shape. Think of the blueprint as your artistic compass, steering you toward a harmonious and well-proportioned woodpecker head.
Adding Details for Beak and Eyes
Beak as a Focal Point: The beak is the focal point of a woodpecker’s character. Carve out a distinctive beak with strategic cuts and shaping. Consider the angle and length, infusing personality into your creation. This is where your woodpecker begins to come to life, with the beak serving as a testament to the intricacies of avian artistry.
Eyes as Windows to Expression: Adding expressive eyes amplifies the woodpecker’s charm. Whether you opt for a realistic depiction or inject a touch of whimsy, the eyes are the windows to your creation’s personality. Consider using contrasting materials or paint to enhance the visual impact and evoke a sense of liveliness.
Attention to Detail: The devil is in the details. Each cut for the beak and each stroke for the eyes should reflect a keen attention to detail. These nuanced elements elevate your woodpecker from a basic sculpture to a nuanced piece of art, capturing the essence of this vibrant bird.
Attaching the Head Securely to the Body
Ensuring Stability: The attachment of the head to the body is a critical juncture. Opt for a secure and stable connection, utilizing high-quality PVC glue and connectors. Stability is not just about physical support; it’s about ensuring that the head aligns seamlessly with the body, creating a cohesive and visually pleasing structure.
Strategic Joint Placement: Consider the placement of the joints. A strategic connection point ensures that the head not only stays firmly in place but also contributes to the overall balance of the woodpecker. This is the moment where individual elements merge into a unified and captivating whole.
Test for Durability: Before declaring victory, conduct a durability test. Gently assess the stability of the head and its connection to the body. This proactive measure ensures that your woodpecker not only looks impressive but also withstands the test of time, becoming a lasting testament to your craftsmanship.
In the shaping of the head, the PVC pipes transform into a canvas where creativity and precision converge. Each cut and contour contributes to the personality of your woodpecker, making it a distinctive piece of art. As you navigate this phase, envision not just a sculpture, but a lifelike representation that captures the essence of a woodpecker’s character, poised and ready to adorn any space with avian grace.
Creating the Tail Feathers
In the intricate tapestry of crafting a PVC woodpecker, the creation of tail feathers emerges as a transformative act, where artistry converges with meticulous craftsmanship. The tail, a symbol of avian elegance, takes shape through a delicate dance of design, attachment, and the pursuit of achieving a realistic feathered effect.
Designing and Cutting PVC Pipes for the Tail
Tail as a Dynamic Element: The tail is not merely an appendage but a dynamic element that adds character and balance to your woodpecker. Begin the design process with a vision of the tail’s length, curvature, and the number of feathers. This conceptualization serves as the blueprint for your PVC canvas.
Precision in Measurement: Meticulously measure and mark the PVC pipes, ensuring uniformity in length and shape. Consider the tail’s proportion to the body, maintaining a harmonious balance that enhances the woodpecker’s overall aesthetic. Precision at this stage sets the foundation for a visually striking and well-balanced sculpture.
Customization for Expression: Tail design allows for customization that reflects your artistic expression. Experiment with variations in length and arrangement, infusing a touch of uniqueness. This bespoke approach transforms the tail from a standardized feature into a personalized statement within the avian narrative.
Attaching the Tail to the Body
Strategic Connection Points: The attachment of the tail is a strategic moment in the assembly process. Ensure that the connection points align seamlessly with the body, contributing to the woodpecker’s stability and visual coherence. This phase is akin to the integration of a critical plot point in a narrative – it enhances the overall storyline.
Sturdy Connectors and Glue: Opt for sturdy connectors and high-quality PVC glue to fortify the bond between the tail and the body. The durability of this connection ensures that your woodpecker not only stands proudly but withstands the test of time. Consider it as fortifying the storyline for longevity and resilience.
Balance and Harmony: The tail, when attached with finesse, contributes to the woodpecker’s balance and harmony. This is the moment when the sculpture transitions from a collection of parts to a cohesive and visually arresting whole. The tail becomes the flourish, the punctuation mark that completes the avian narrative.
Achieving a Realistic Feathered Effect
Strategic Cuts for Texture: Achieving a realistic feathered effect requires strategic cuts along the edges of the tail. Mimic the texture of feathers by carefully shaping the PVC pipes. This attention to detail adds a layer of realism, transforming the tail from a structured element into an intricately detailed representation of avian plumage.
Painting Techniques: Elevate the realism by employing painting techniques that emulate the vibrant hues found in nature. Consider a combination of earthy tones for authenticity and bold accents to infuse personality. This artistic touch breathes life into the tail, making it a visually captivating focal point of your woodpecker sculpture.
Gradation for Depth: Use gradation in paint application to create depth and dimension within the tail feathers. This technique imparts a sense of movement, as if the woodpecker is poised for flight. The interplay of light and shadow on the textured surface enhances the overall visual impact, captivating the observer with its lifelike allure.
In the creation of tail feathers, the PVC pipes metamorphose into delicate plumes that tell a story of elegance and grace. From design conceptualization to the strategic attachment and the pursuit of a realistic feathered effect, each step contributes to the narrative, making your PVC woodpecker not just a sculpture but a testament to the seamless fusion of art and craftsmanship.
Painting Your Woodpecker
In the artistic journey of crafting a PVC woodpecker, the painting phase emerges as the crescendo, infusing life and personality into the meticulously assembled structure. Painting is where the woodpecker transcends from a mere sculpture to a vibrant and visually captivating work of art.
Choosing Vibrant Acrylic Colors
Color as Expression: The choice of acrylic colors is pivotal, akin to selecting a palette that will articulate the woodpecker’s personality. Vibrancy adds life to the sculpture, making it an engaging focal point in any setting. Consider colors that reflect the woodpecker’s natural hues while leaving room for artistic expression.
Harmony in Hues: Create a harmonious blend of colors that complements the overall aesthetic. Whether you opt for the earthy tones of a realistic woodpecker or infuse playful and unconventional colors, the harmony in hues ensures a visually pleasing result. This selection stage is akin to setting the tone for the woodpecker’s visual narrative.
Contrasting Accents: Introduce contrasting accents strategically. These accents highlight specific features, such as the head, tail feathers, or intricate patterns. Think of it as the artistic strokes that draw attention to the woodpecker’s defining characteristics, adding an extra layer of visual interest.
Adding Details and Patterns
Intricate Details as Narrative: Adding details is where the woodpecker’s story unfolds. Consider intricate patterns that mimic feathers or distinctive markings. Each stroke of the brush contributes to the narrative, transforming the woodpecker into a personalized work of art. This stage is reminiscent of a storyteller weaving details into a tale, creating depth and character.
Personalization Through Patterns: Patterns offer a canvas for personalization. Whether you opt for naturalistic patterns found in woodpecker species or inject a touch of artistic flair, these patterns become the signature of your creation. This bespoke approach elevates the woodpecker from a generic sculpture to an individualized masterpiece.
Precision in Execution: Attention to detail is paramount. Precision in executing patterns ensures a polished and professional finish. Whether it’s the delineation of individual feathers or the meticulous rendering of facial features, each detail contributes to the woodpecker’s overall charm. This is the stage where craftsmanship meets creativity.
Allowing Time for the Paint to Dry
Patience as a Virtue: As you lay the final strokes, exercising patience becomes a virtue. Allow ample time for the paint to dry completely. This patience ensures that the colors set, preventing smudging or unintended blending. Think of it as the final act of restraint before unveiling your completed masterpiece.
Protection During Drying: During the drying process, protect your woodpecker from potential disturbances. Place it in a controlled environment away from dust or accidental contact. This precautionary measure safeguards the integrity of your painting effort, ensuring a flawless finish.
Reflecting on the Journey: While the paint dries, take a moment to reflect on the journey from a stack of PVC pipes to a painted woodpecker. Each stroke represents creativity, dedication, and a culmination of skills. This reflection sets the stage for the satisfaction of witnessing your creation come to life.
In the realm of painting your woodpecker, each brushstroke is a testament to the fusion of art and craftsmanship. From choosing vibrant acrylic colors to adding intricate details and patterns, the process is akin to a painter creating a canvas that tells a story. As you allow time for the paint to dry, anticipate the moment when your woodpecker transforms into a vibrant and expressive piece of art, ready to adorn any space with its avian charm.
Fine-tuning and Adjustments
In the symphony of crafting a PVC woodpecker, the stage of fine-tuning and adjustments is the final crescendo, where precision and attention to detail harmonize to perfect the avian masterpiece. This phase is akin to a conductor refining every note to ensure a flawless performance, transforming your creation into a striking and enduring work of art.
Checking the Overall Structure
Visual Harmony Inspection: Begin by conducting a visual harmony inspection of the overall structure. Step back and assess the woodpecker from different angles, ensuring that each component seamlessly integrates into a cohesive whole. This panoramic view serves as the first step in identifying any potential adjustments needed.
Proportion Assessment: Examine the proportions meticulously. Verify that the head, body, tail, and wings maintain a proportional balance. This step is akin to a sculptor ensuring that each dimension aligns with the envisioned blueprint, creating a visually appealing and anatomically accurate representation of a woodpecker.
Alignment Verification: Check the alignment of each component to guarantee symmetrical perfection. This meticulous verification ensures that the woodpecker stands as a testament to your craftsmanship, free from any visual discrepancies. Alignment serves as the backbone, reinforcing the overall aesthetic integrity of the sculpture.
Making Any Necessary Adjustments
Precision Refinement: If any discrepancies are identified during the inspection, embark on a journey of precision refinement. Whether it’s minor adjustments to the angle of the head, the curvature of the tail, or the positioning of wings, these subtle refinements elevate your woodpecker from a good sculpture to an exceptional one.
Connection Strengthening: Pay special attention to the connections between components. Strengthen any loose joints using additional PVC glue or connectors. This reinforcement not only fortifies the woodpecker’s structural integrity but also contributes to its longevity, ensuring it withstands the test of time.
Enhancing Visual Flow: Evaluate the visual flow of your creation. Ensure that the transition from head to body to tail is seamless, creating a fluid and organic aesthetic. These adjustments enhance the woodpecker’s overall visual impact, captivating observers with its lifelike and graceful presence.
Ensuring the Woodpecker Stands Properly
Stability Assessment: The woodpecker’s ability to stand properly is paramount. Assess its stability on the chosen display surface, verifying that it rests evenly and securely. This step is akin to a carpenter ensuring a table stands firm on all four legs. Stability guarantees that your woodpecker becomes a centerpiece without risk of toppling.
Surface Compatibility: Consider the surface on which the woodpecker will stand. If it’s an uneven or delicate surface, make necessary adjustments to the base, such as adding felt or rubber pads. This thoughtful consideration safeguards not only the woodpecker but also the surface it graces, ensuring a harmonious coexistence.
Final Balance Check: Conduct a final balance check, gently nudging the woodpecker to ascertain its steadiness. This is the moment where the culmination of meticulous craftsmanship and fine-tuning ensures that your woodpecker stands not just as a static sculpture but as a dynamic and captivating piece of art.
In the realm of fine-tuning and adjustments, every nuanced detail contributes to the woodpecker’s perfection. From the overall structure inspection to making precision refinements and ensuring proper stance, this phase elevates your creation to a level of artistic excellence. As you meticulously refine each aspect, envision your woodpecker standing proudly, a testament to your dedication, skill, and the seamless fusion of artistry and craftsmanship.
Displaying Your PVC Woodpecker
As you stand before your completed PVC woodpecker, a masterpiece born from pipes and imagination, the final act is unveiling its avian charm to the world. Displaying your creation is not just about placement; it’s a celebration of your artistic journey and an opportunity to share the culmination of your efforts with others. Here’s how to transform your PVC woodpecker into a captivating centerpiece that not only adorns your space but also becomes a conversation starter.
Selecting an Ideal Location
Consideration of Space Dynamics: Choose a location that complements the size and aesthetic of your woodpecker. Whether it’s a garden, porch, living room, or a dedicated art space, the dynamics of the space should enhance rather than overshadow your creation. Think of it as curating an art gallery with your woodpecker as the star exhibit.
Natural Lighting Enhancement: Opt for spaces with ample natural light to accentuate the vibrant colors of your painted woodpecker. Natural lighting not only brings out the nuances of your creation but also creates a dynamic interplay of shadows, adding depth and dimension to the display. This thoughtful choice transforms your woodpecker into a visual spectacle.
Consideration of Surroundings: Ensure your woodpecker harmonizes with its surroundings. If it’s an outdoor display, think about how it interacts with the elements – a garden backdrop, a tree branch, or a secluded nook. The synergy between your woodpecker and its surroundings contributes to a harmonious visual narrative.
Incorporating Your Creation into Your Space
Theme Integration: If your space follows a particular theme or color palette, integrate your woodpecker seamlessly into this aesthetic. Consider it as curating an interior design element that not only stands out but also complements the existing decor. This incorporation ensures your woodpecker feels like an organic extension of your space.
Focal Point Placement: Position your woodpecker as a focal point within the chosen space. Whether it’s at the center of a garden, on a prominent shelf, or as part of a curated art wall, the strategic placement ensures that your creation commands attention. Think of it as giving your woodpecker a stage where it can shine and captivate.
Dynamic and Artistic Arrangement: Experiment with dynamic arrangements to infuse an artistic flair. Consider placing the woodpecker in flight-like positions, perched on a branch, or amidst a curated collection of plants. This artistic arrangement elevates your woodpecker from a mere sculpture to a visually engaging piece of art that tells a story.
Sharing Your Project with Others
Creating a Narrative: Share the story behind your woodpecker. Whether it’s the inspiration, the crafting process, or the symbolism, creating a narrative adds a layer of depth to your project. This storytelling aspect transforms your woodpecker into more than a visual delight; it becomes a shared experience with those who encounter it.
Social Media Showcase: Extend the display beyond your immediate space by showcasing it on social media platforms. Share images, time-lapse videos of the crafting process, or anecdotes related to the project. This digital exhibition not only amplifies your creation but also connects you with a community of like-minded individuals who appreciate artistic endeavors.
Open House Events: Consider organizing open house events or art exhibitions where your woodpecker takes center stage. This physical showcase allows friends, family, and art enthusiasts to witness the intricate details and vibrant colors up close. It’s a moment of communal appreciation for the fusion of creativity and craftsmanship.
In the act of displaying your PVC woodpecker, each choice – from location selection to thematic integration and narrative sharing – transforms it from a solitary creation to a shared experience. The culmination of your artistic journey finds resonance not only within the confines of your space but also resonates with those who encounter and appreciate the avian marvel you’ve brought to life.
Tips and Tricks
Embarking on the journey of crafting a PVC woodpecker is not just a creative endeavor; it’s a nuanced process that involves a delicate balance of safety, experimentation, and customization. Here are some invaluable tips and tricks that will not only enhance your woodpecker-making experience but also set your creation apart as a unique work of art.
Safety Precautions with PVC Cutting
Protective Gear is Paramount: Before diving into the realm of PVC cutting, prioritize safety. Equip yourself with essential protective gear, including safety glasses and gloves. PVC cutting involves precision, and safeguarding your eyes and hands ensures a secure crafting process.
Adequate Ventilation: Work in a well-ventilated space or, ideally, outdoors to minimize exposure to PVC dust and fumes. Proper ventilation not only enhances safety but also contributes to a comfortable crafting environment.
Mindful Cutting Techniques: Use a PVC pipe cutter for precise and controlled cuts. Keep hands away from the cutting area, and exercise caution to avoid accidental injuries. Adhering to safe cutting practices ensures a smooth and secure crafting process.
Experimenting with Different Paint Techniques
Primer for PVC Adhesion: Begin your painting journey with a primer specifically designed for PVC surfaces. This enhances paint adhesion and provides a solid foundation for your chosen colors.
Acrylics for Vibrancy: Opt for acrylic paints for their vibrant colors and quick drying properties. Experiment with different brush techniques, from stippling to dry brushing, to create textures and visual interest on your woodpecker.
Weather-resistant Sealant: After applying the paint, seal your woodpecker with a weather-resistant sealant. This not only protects the colors from the elements but also ensures the longevity of your creation, allowing it to withstand the test of time.
Customization Ideas for a Unique Woodpecker
Feather Patterns and Colors: Get creative with the feather patterns and colors of your woodpecker. Research real woodpecker species for inspiration, or let your imagination run wild with fantastical color combinations. Customizing the plumage adds a personalized touch to your creation.
Artistic Beak Variations: Experiment with different beak shapes and sizes. Whether it’s a long and slender beak or a more whimsical design, the beak is a focal point that can define the character of your woodpecker.
Accessory Additions: Consider adding accessories such as a miniature nest, a pair of spectacles, or a tiny hat to inject personality into your woodpecker. These subtle details elevate your creation from a mere sculpture to a storytelling art piece.
In the realm of PVC woodpecker crafting, safety, creativity, and customization are the pillars of a rewarding experience. By following these tips and tricks, you not only ensure a secure crafting process but also open the door to a world of artistic possibilities. Let your woodpecker be a testament to your craftsmanship, showcasing not only technical skill but also the boundless creativity that sets your creation apart as a unique and captivating masterpiece.
In conclusion
As we concluded our quest to create a PVC woodpecker, we embarked on a DIY adventure, transforming ordinary PVC pipes into a vibrant work of art. It took four steps to complete each step, from the initial planning to the final strokes of paint. The joy of creating something with your hands is evident in the effort required to construct your woodpecker.
You’re getting closer to completing your PVC woodpecker, and you’re looking forward to it because you’ve learned new skills as a result of it. An art piece is more than just a decoration; it is a work of art that reflects your imagination and is as satisfying as it is functional. The journey itself is intended to highlight the importance of craftsmanship and innovation.
Consider the charm your PVC woodpecker adds to your surroundings – a playful touch of nature infused with your personal flair. Whether it is proudly displayed indoors or outdoors, it serves as a reminder of the artistic potential within all of us. This project allows you to express yourself in a new light, and it’s something you can do because we DIY enthusiasts are constantly looking for new ways to express ourselves.
Your PVC woodpecker should serve as a reminder of the journey you took, from carefully planning and cutting it to its transformative power. The story is a story that is being told not just through the creation of a sculpture, but also through its sharing. As a result, your woodpecker will become a conversation starter, a symbol of your artistic talent, and an inspiration to others in their journeys. We wish you all the best in your DIY projects, as well as the opportunity to make and have fun.
Amhil Khan, a dedicated nature enthusiast and the founder of BirdsOfTheWild.com, is a passionate advocate for the captivating world of avian wonders. With a deep-seated curiosity about the intricate lives of birds, Amhil’s journey began as a fascination and has evolved into a mission to inspire others to appreciate and protect these magnificent creatures.
Amhil’s love for birds led to the creation of Birds of the Wild, a platform where his expertise in ornithology, coupled with his captivating storytelling, provides readers with an immersive and educational experience. Through his lens and words, he captures the essence of birds in their natural habitats, offering a glimpse into their behaviors, migrations, and the ecosystems they inhabit.