

Are you ready to embark on a creative journey where the strokes of your pencil bring a beautiful sparrow to life on paper? Have you ever wondered how artists capture the essence of these delicate birds in their drawings? If you’ve got the itch to explore your artistic side and want to learn the art of drawing a sparrow, you’ve come to the right place.
In this step-by-step guide, we’ll unravel the secrets of drawing a sparrow, from its graceful wings to its tiny claws gripping a branch. Whether you’re a budding artist or simply curious about the process, we’ll walk you through each stage, making it easy to create a stunning sparrow drawing.
So, let’s grab your pencil, sharpen your skills, and let your creativity take flight as we dive into the world of drawing sparrows.
Have you ever tried to capture the beauty of nature on paper? Share your thoughts and experiences with us as we embark on this artistic adventure together!
Materials Needed
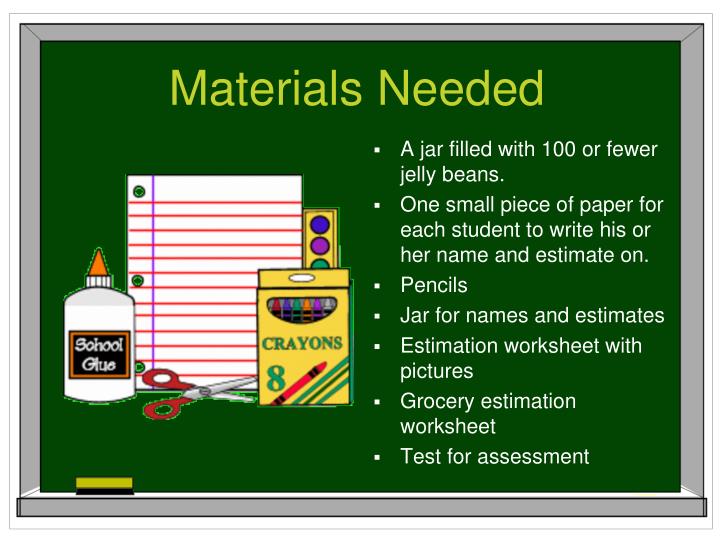
When it comes to embarking on the artistic journey of drawing a sparrow, the first step is to ensure you have the right materials at your fingertips. Much like a chef needing the finest ingredients to craft a gourmet meal, an artist relies on their toolkit for creating a masterpiece. Let’s delve into the essential materials needed to create a stunning sparrow drawing.
- Paper: The foundation of your drawing is crucial. Opt for high-quality, acid-free paper to prevent yellowing and deterioration over time. A heavier weight paper (around 140lb or 300gsm) is ideal as it can handle various drawing techniques without warping.
- Pencil: The trusty pencil is your primary instrument. Choose a range of graphite pencils with different hardness levels (e.g., 2H to 6B) to achieve varying degrees of shading and detailing. Mechanical pencils can provide precision for intricate work.
- Eraser: Mistakes are part of the artistic process, so a good eraser is essential. A kneaded eraser is versatile, allowing you to shape it to erase fine lines or large areas without smudging.
- Coloring Tools: If you plan to add color to your sparrow drawing, gather your coloring tools. Colored pencils offer control and blendability, while watercolor pencils can create beautiful washes. Watercolor paints provide vibrant hues, and markers offer sharp, bold colors. Ensure you have a palette of colors that match the sparrow’s plumage.
The Art of Selection
Selecting the right materials might seem like a simple task, but it’s a crucial aspect of ensuring your drawing turns out as envisioned. The choice of paper, for instance, can significantly impact the final result. Opting for acid-free paper ensures that your creation will stand the test of time, resisting yellowing or deterioration, a concern for any serious artist.
The pencil you choose is your main conduit to bring the sparrow to life on paper. The range of graphite pencils you select is vital, as they determine the shades and textures you can achieve. Whether it’s the fine lines of the sparrow’s feathers or the bold outlines, having the right pencils at hand is indispensable.
Erase to Create
In the world of art, mistakes are inevitable and even welcomed, as they offer opportunities for growth and refinement. This is where a high-quality eraser becomes your ally. A kneaded eraser can be molded to suit your needs, whether you’re delicately erasing a stray line or correcting a larger portion of your drawing. With the right eraser, your creative process becomes more forgiving.
Adding Life with Color
Should you choose to infuse your sparrow drawing with color, selecting the appropriate coloring tools is paramount. Colored pencils, with their versatility and control, allow you to layer and blend colors seamlessly. Watercolor pencils offer the ability to add washes and gradients, while watercolor paints bring vibrancy to your artwork. Markers, on the other hand, provide sharp and bold colors. Ensuring your palette harmonizes with the sparrow’s plumage will make your creation truly come to life.
In the realm of artistry, the choice of materials is not just about practicality; it’s about realizing your creative vision. Your sparrow drawing will be a testament to your skills, guided not only by your talent but also by the careful selection of the right materials. With paper that endures, pencils that offer precision, erasers that forgive, and coloring tools that breathe life into your creation, your artistic journey is poised for success. So, gather your materials, and let the artistry take flight as you draw a sparrow that captures the essence of this graceful bird.
Step 1: Basic Outline

In the fascinating world of artistry, every masterpiece begins with a basic outline, a foundation upon which the rest of the creation is built. Drawing a sparrow is no exception. Step 1 is where we lay the groundwork, much like an architect sketches the blueprint for a magnificent structure. Let’s dive into this crucial step, unraveling the intricacies of how to embark on your journey to draw a sparrow.
- Starting with Simplicity: Begin by sketching a simple oval shape, which will form the foundation of the sparrow’s body. This oval serves as the core structure that you’ll gradually refine and embellish as your drawing progresses. Think of it as the skeleton on which the sparrow’s lifelike form will be draped.
- Guiding the Head: Next, within the broader oval, envision the placement of a smaller oval for the sparrow’s head. This step is akin to defining the creature’s identity. It’s where the character and personality of your avian subject come to life. Take your time with this part, as the head is often the focal point of the drawing, capturing the essence of the bird.
- Proportion Matters: As you embark on this creative endeavor, keep a watchful eye on proportion. The size and placement of these ovals are the building blocks of a realistic portrayal. Pay attention to the distance between the body and the head, ensuring it aligns with the sparrow’s natural anatomy. Proportion is the compass that will guide your drawing to authenticity.
The Art of Simplicity
Starting with a basic oval may seem, well, basic, but it’s this simplicity that sets the stage for artistic brilliance. Artists understand that the most intricate and detailed creations often begin with the humblest of shapes. This initial oval is your canvas, waiting to be transformed into a living, breathing sparrow.
A Head Above the Rest
Within the larger oval, your sparrow’s identity begins to take shape with the addition of the smaller oval for the head. It’s here that the bird’s character emerges, capturing the spirit of this delicate creature. The head is not just a part of the drawing; it’s the heart and soul of your sparrow.
Proportion: The Key to Authenticity
In the realm of art, proportion is the North Star that guides us. It’s the compass that ensures our creations align with reality. Pay close attention to the size and placement of the ovals. A subtle shift can make a world of difference in the final result. Whether you’re aiming for hyper-realism or a more stylized representation, proportion is the bridge that connects your drawing to the real world.
As you embark on Step 1, remember that every great artist once started with a basic outline. These seemingly straightforward ovals are the cornerstone of your sparrow drawing. They hold the promise of what’s to come—a masterpiece waiting to take flight. So, with pencil in hand, let your journey into the world of drawing sparrows begin, one simple shape at a time.
Step 2: Wings and Tail
As we journey deeper into the realm of drawing a sparrow, we arrive at Step 2, where the sparrow begins to take its distinctive shape with the wings and tail. It’s in this phase that the bird’s graceful form starts to emerge, much like a sculptor chiseling away to reveal a masterpiece hidden within stone. Let’s delve into the intricacies of guiding you through this pivotal step in drawing a sparrow.
Guiding with Curved Precision: To bring the sparrow to life, begin by sketching the wings using gently curved lines. Imagine the wings extended in a subtle arc, ready to take flight. The key here is to maintain the delicate balance between realism and simplicity. The sparrow’s wings are not overly complex; they are a testament to nature’s elegance. Pay attention to the curvature of the lines, ensuring they mirror the gentle sweep of the bird’s wingspan. It’s akin to sketching a pair of parentheses, emphasizing the softness and subtlety of the bird’s wings.
Defining the Tail: Moving on to the tail, it’s crucial to understand the unique shape and size of a sparrow’s tail feathers. Unlike some birds with extravagant tails, sparrows boast a more modest tail. Picture a fan-shaped arrangement of feathers, like an open hand, gently spread in the back. This tail shape adds to the sparrow’s charm and aerodynamic efficiency. Draw the feathers with short, curved lines, converging towards the centerline of the tail. The result should resemble a fan partially opened, a defining feature that sets the sparrow apart.
Embracing Symmetry: As you proceed, remember that symmetry plays a pivotal role in this step. A sparrow’s wings and tail are naturally symmetrical, contributing to its balanced and streamlined form. Ensure that the wings and tail are mirror images of each other, creating a harmonious and aesthetically pleasing composition. Symmetry brings a sense of order and completeness to your drawing, capturing the essence of the sparrow’s graceful flight.
Curvature and Elegance
The wings and tail of a sparrow are testaments to nature’s artistry and efficiency. While drawing the wings, envision the bird’s potential for flight—those curved lines symbolize both freedom and grace. Embrace the gentle sweep of the lines, curving just right to embody the essence of the sparrow’s wingspan.
A Fan of Feathers
A sparrow’s tail is a distinctive feature, and capturing its shape is key to an accurate portrayal. Think of it as an open fan, its feathers arranged in a subtle, symmetrical pattern. Each feather is like a brushstroke on your canvas, contributing to the bird’s overall charm and authenticity.
Symmetry in Flight
Symmetry is nature’s way of creating balance and efficiency, and it’s evident in the wings and tail of a sparrow. As you sketch, ensure that the wings and tail maintain their symmetrical allure. It’s this balance that gives your drawing a sense of completeness and captures the sparrow’s innate harmony.
In Step 2, as you master the art of sketching wings and tail, you’re one step closer to creating a sparrow drawing that mirrors the beauty of the natural world. These seemingly simple details hold the key to capturing the essence of this beloved bird. So, let your lines flow with curvature and elegance, crafting a sparrow that’s not just a drawing but a work of art that embodies the spirit of flight and grace.
Step 3: Eyes and Beak
As we continue our artistic journey in the creation of a sparrow drawing, Step 3 beckons us to focus on two defining features that give this bird its unique character and charm—the eyes and beak. Much like a portrait artist capturing the soul of their subject, detailing the eyes and beak of the sparrow requires precision and attention to nuance. Let’s explore this step and unravel the secrets to bringing life and realism to these vital elements.
Eyes that Speak Volumes: The sparrow’s eyes are windows to its world, and capturing their essence is essential. Begin by outlining the shape of the eyes. Sparrows have relatively small, round eyes, often with a dark, shiny appearance. To achieve this effect, lightly shade the inner portion of the eye, leaving a small, reflective highlight to convey that characteristic twinkle. Pay attention to the placement of the eyes, as they are positioned on either side of the head, giving the bird a wide field of vision. For a realistic touch, add a tiny, dark dot within the highlight to mimic the pupil. This subtle detail brings depth and life to the eyes.
The Beak’s Unique Profile: The beak is a defining feature of any bird, and for sparrows, it plays a significant role in their overall appearance. Begin by sketching the beak’s shape, which is typically conical and pointed. It curves slightly downwards, resembling a small, triangular instrument designed for precision. Pay attention to the placement of the beak on the head, just below the eyes and towards the front. This placement aligns with the bird’s feeding habits and adds authenticity to your drawing. To infuse realism, shade the beak slightly to give it dimension and depth. Sparrows have different beak colors depending on the species, so research your specific sparrow to choose the right hues for your artwork.
Tips for Realistic Details: Achieving realistic details in the eyes and beak is all about subtlety and finesse. Here are some tips to elevate your drawing:
- Use a fine-tip pencil or shading tool for intricate work on the eyes and beak.
- Observe real-life sparrows or reference images to grasp the nuances of eye and beak shapes.
- Layer your shading gradually, building up tones for a gradual, realistic effect.
- Be patient; the eyes and beak are intricate, and meticulous attention will yield impressive results.
- Consider the lighting source in your drawing to determine where highlights and shadows fall on the eyes and beak.
The Eyes’ Story
The sparrow’s eyes are not just features; they are storytellers. They convey the bird’s personality, curiosity, and vitality. When you draw them, remember to mimic the reflective quality of the eyes and capture that tiny, telling dot within the highlight—the key to their lifelike allure.
The Beak’s Signature
The beak defines the sparrow’s purpose and identity. It’s precision personified, and drawing it accurately is paramount. Embrace its conical shape and subtle curve, and remember that the beak’s color can vary between species. It’s not just a beak; it’s a signature.
In Step 3, as you venture into the intricate world of the sparrow’s eyes and beak, you’re not merely drawing; you’re sculpting character and identity. These nuanced features transform your artwork from a mere sketch to a vivid portrayal of nature’s wonders. So, let your pencil dance with precision, for in the eyes and beak of the sparrow, you capture the essence of a bird that has long captured our hearts.
Step 4: Feathers and Details
In the intricate tapestry of creating a sparrow drawing, Step 4 unveils the feathered beauty of this avian marvel. As we delve into this stage, we’ll explore the art of adding feather-like textures to the body, deciphering the unique markings that define sparrows, and embracing the virtues of patience and precision. Like a skilled weaver, we will intricately thread the details that transform your drawing into a lifelike representation of this beloved bird.
Feathers: Nature’s Elegance: Sparrows are renowned for their intricate feather patterns that provide camouflage and protection in their natural habitats. To replicate these feather-like textures, start with the body of the sparrow. Using a sharp pencil or shading tool, create tiny, overlapping strokes that follow the contours of the oval you initially sketched. These strokes should resemble short, fine lines, with some areas darker to mimic the shadows between feathers. Pay close attention to the direction of your strokes, which should radiate outward from the center, mirroring the natural growth pattern of feathers. This meticulous approach will imbue your drawing with the delicate beauty of a sparrow’s plumage.
Markings and Patterns: Sparrows exhibit unique markings and patterns that vary among species. To capture these distinctive features, research your specific sparrow type to understand its markings accurately. Some sparrows boast bold streaks or spots, while others may have subtler, more intricate patterns. Implementing these details requires a steady hand and an eye for accuracy. Remember that precision is key to rendering these markings realistically. Take your time to ensure each marking is thoughtfully and accurately represented.
Patience and Precision: Throughout this step, patience and precision are your guiding principles. Feathering the body and incorporating markings demand a meticulous approach. Sparrows are known for their attention to detail, and your drawing should reflect the same care. Take breaks if needed to maintain a steady hand and a fresh perspective. Remember, each stroke you make is a brushstroke of artistry, a testament to your dedication to capturing the essence of this feathered friend.
Feathered Textures
Feathering the body is like a dance of intricacy. Those tiny strokes become the threads that weave together the elegant fabric of a sparrow’s plumage. Pay attention to direction, density, and shading, and watch as your drawing gradually transforms into a mesmerizing representation of nature’s artistry.
Markings That Matter
Sparrows don distinct markings that make them easily recognizable. From bold streaks to subtle patterns, each species carries its own signature. Your task is to embrace these markings with precision, ensuring they mirror the unique identity of the sparrow you’re drawing.
The Virtues of Patience and Precision
As you embark on Step 4, remember that the art of drawing sparrows is not a hurried journey. It’s a testament to your dedication, patience, and precision. Each stroke you make adds depth and realism to your creation. Like a sculptor refining their masterpiece, you’re shaping a sparrow that captures the hearts of those who behold it.
In Step 4, you’re not just drawing; you’re breathing life into the sparrow’s plumage, crafting an artwork that mirrors the exquisite details of the natural world. So, with diligence and devotion, let your pencil be the brush that paints the intricate portrait of a sparrow—a work of art that celebrates the beauty of nature’s design.
Step 5: Legs and Feet

In the final act of our avian artistic journey, Step 5 invites us to focus on two essential elements that ground our sparrow drawing and give it a sense of presence and vitality—its legs and feet. Drawing these aspects may seem like a minor detail, but it’s these nuances that bring our feathered friend to life and complete the masterpiece. Let’s explore the intricacies of sketching the legs with tiny claws, understanding the positioning of the feet on a branch, and imbuing the legs with natural grace.
Legs with Tiny Claws: Begin by defining the legs of the sparrow. Sparrows have relatively slender legs that are covered in fine, scaly texture. To create this texture, use short, parallel lines that run vertically along the length of the legs. Pay attention to the size and placement of the legs, ensuring they are in proportion to the body. At the end of each leg, draw tiny, pointed claws. These are the tools that allow the sparrow to perch and navigate its environment. Keep the claws subtle but precise, resembling miniature hooks that grasp onto branches or perches.
Positioning on the Branch: Sparrows are often depicted perched on branches or wires, so it’s crucial to understand how to position the feet realistically. Imagine the branch as a cylindrical shape, and sketch the feet in a way that conforms to this contour. Typically, sparrows have three forward-facing toes and one backward-facing toe, a configuration that aids in their stability while perched. The toes should appear slightly curved to mimic the act of gripping the branch. Ensure that the feet are symmetrical, reflecting the balanced posture of the sparrow.
Natural Grace: To make the legs and feet look natural, consider the overall posture of the sparrow. Sparrows are known for their agility and grace while perched. Observe real-life sparrows or reference images to grasp their posture accurately. The legs should appear relaxed but ready for action, conveying the bird’s readiness to take flight at a moment’s notice. The key is to avoid stiffness; instead, infuse a sense of life and vitality into your drawing.
The Fine Art of Legs and Claws
The legs and tiny claws of a sparrow are not just appendages; they are the tools of its trade. Those vertical lines and miniature hooks are the details that ground the bird, allowing it to perch and take flight with ease. It’s in these subtle touches that you capture the essence of a sparrow’s anatomy.
Perching with Poise
When positioning the feet on a branch, envision the sparrow’s balance and grace. Its toes should delicately curve around the cylindrical form of the perch, reflecting the bird’s natural ability to maintain an elegant posture while resting or preparing for flight. It’s not just about placement; it’s about portraying poise.
Natural Beauty in Posture
As you wrap up your sparrow drawing with the legs and feet, remember that these elements should convey a sense of natural beauty in posture. The sparrow’s legs aren’t just functional; they embody grace and readiness. The bird is poised for its next adventure, and your drawing should capture that spirit.
In Step 5, you’re not merely drawing legs and feet; you’re sculpting the foundation of your sparrow’s existence. These final touches breathe life into your creation, transforming it from a mere sketch into a living representation of one of nature’s most charming creatures. So, with precision and finesse, let your pencil craft the legs and feet that complete your sparrow drawing—a masterpiece that stands as a testament to your artistic journey.
Step 6: Branch or Perch
As we reach the final crescendo of our artistic symphony, Step 6 introduces the critical element that anchors our sparrow drawing—a branch or perch. This component not only serves as the bird’s stage but also provides context to the composition, adding depth and storytelling to your artwork. In this step, you’ll learn how to instruct readers on drawing a lifelike branch or perch, including details like bark texture and thickness, and master the art of positioning the bird on its chosen stage.
Drawing the Branch: Begin by selecting the ideal location for the branch within your composition. Consider the flow and balance of your drawing, as the branch’s placement can significantly impact the overall aesthetics. Once you’ve decided, sketch the basic shape of the branch. Sparrow perches are often slender and slightly curved, mimicking the graceful contours of nature. To give it authenticity, add knots and irregularities to the bark texture. These nuances make the branch appear more organic and lived-in.
Texture and Thickness: The bark texture is where the magic lies in creating a realistic branch. Utilize short, irregular lines to simulate the roughness of tree bark. Vary the pressure of your pencil strokes to create tonal differences, with darker areas indicating shadows and lighter areas representing highlights. Sparrows often perch on branches of varying thickness, so ensure your branch is proportionate to the size of your bird. Thick branches can offer stability and a sense of grandeur, while slender ones provide a delicate elegance.
Positioning the Bird: Placing the sparrow on the branch is an art in itself. Consider the bird’s anatomy and behavior. Sparrows typically grip the branch with their three forward-facing toes while the fourth points backward for balance. This posture portrays a sense of readiness and comfort. Ensure that the bird’s feet seamlessly conform to the curvature of the branch, and its body language exudes a natural, relaxed demeanor.
The Artistry of Branch and Perch
Drawing the branch or perch is more than just creating a stage for your sparrow; it’s a brushstroke in the narrative of your artwork. Pay attention to details like placement, texture, and thickness, for in these subtleties, you breathe life into your drawing.
Bark Texture and Realism
The bark texture is your tool for adding authenticity. Those irregular lines and tonal variations are what make your branch come alive. They tell a story of time and weather, of a perch where your sparrow finds solace.
The Bird’s Comfort Zone
Positioning the bird on the branch isn’t just about balance; it’s about conveying comfort and readiness. Mimic the sparrow’s natural grip, and let its body language speak of a creature at ease in its element. It’s more than placement; it’s about storytelling.
In Step 6, you’re not just drawing a branch or perch; you’re creating the stage where your sparrow comes to life. This final touch is where your art transforms from a mere drawing into a living portrayal of nature’s beauty. So, with an artist’s eye and a storyteller’s heart, let your pencil craft the branch or perch that completes your masterpiece—a work of art that tells the story of a sparrow in its natural habitat.
Step 7: Final Touches
As we approach the concluding act of our sparrow drawing journey, it’s time to add the final touches that will elevate your artwork from a mere sketch to a lifelike portrayal of this beloved bird. In Step 7, we delve into the art of shading and adding depth to your drawing, suggest using various shades of brown and gray to capture the sparrow’s natural hues, and encourage you to take your time, refine your work, and let your artistic prowess shine.
Shading and Depth: Shading is where your drawing truly comes to life. To create a sense of depth and dimension, use your pencil to add varying degrees of darkness and lightness to different parts of the drawing. Observe your reference images closely to understand where shadows fall and where highlights emerge. For the sparrow’s body, focus on the areas where feathers overlap or curve away from the light source. These are the regions that should be shaded darker to create a three-dimensional effect. Use gentle, hatching strokes for subtle shading and cross-hatching for deeper shadows. Remember, shading is an art of subtlety, so take your time to build up layers of shading gradually.
Utilizing Brown and Gray: Sparrows are known for their earthy tones, with shades of brown and gray dominating their plumage. To capture these natural hues, employ a range of brown and gray pencils in your arsenal. Layer these colors to create a realistic blend that mirrors the sparrow’s feathers. Start with lighter shades and gradually build up to darker ones, allowing the colors to seamlessly merge. Be attentive to the unique markings and patterns of the sparrow, as some species may have distinct colors and patterns on their wings or heads. Accuracy in color choice and application is key to achieving a lifelike appearance.
Taking Your Time: The final step is not one to be rushed. Take your time to inspect your drawing, scrutinize the details, and make any necessary refinements. Sparrows are renowned for their intricate markings, and your drawing should reflect the same level of detail. Pay attention to the placement of markings, the accuracy of proportions, and the overall balance of your composition. Refinement is where your artistry shines through, so don’t be afraid to revisit and revise your work until you’re satisfied with the result.
The Art of Shading
Shading isn’t just about darkness and lightness; it’s about adding life and depth to your drawing. It’s where you breathe vitality into your sparrow, making its plumage come alive with each stroke of your pencil. Patience and precision are your allies in this artistic journey.
Earthy Hues: Brown and Gray
Nature’s palette provides a rich spectrum of browns and grays, and these are your tools for capturing the essence of the sparrow. Layer these colors with care, paying heed to the subtle variations in hue that define each species. Your drawing should echo the tones of the natural world.
The Artistic Finale
In the realm of art, the final touches are where the magic happens. This is your opportunity to perfect your creation, to breathe life into your sparrow, and to let your artistic prowess shine. The time you invest in refinement will be evident in the exquisite details of your finished drawing.
In Step 7, you’re not just concluding your drawing; you’re putting the finishing strokes on a masterpiece. Your pencil becomes a conduit for artistry, shaping a sparrow that captures the hearts of those who behold it. So, with patience, precision, and a keen eye for detail, let your artistic vision soar to its fullest potential, and create a sparrow drawing that stands as a testament to your dedication and talent.
Step 8: Coloring (Optional)
In the grand finale of your sparrow drawing journey, we explore the realm of coloring—a step that is as optional as it is transformative. Adding color to your artwork can infuse it with life, realism, or artistic flair, depending on your creative vision. In Step 8, we’ll delve into the techniques and tools you can use to breathe vibrant hues into your sparrow, from watercolors to colored pencils and markers. Moreover, we’ll highlight the importance of blending and layering colors to achieve the desired effect.
Using Colors for Realism or Artistry: The choice to color your sparrow drawing is entirely yours, and it depends on the artistic outcome you desire. If realism is your goal, then study your reference images carefully and select colors that match the sparrow species you’re portraying. Observe the subtle variations in plumage, and use colors that mimic nature’s palette. On the other hand, if you seek artistic expression, let your imagination run wild. Experiment with vibrant colors, patterns, and textures to create a unique and stylized rendition of the sparrow. Coloring adds a personal touch to your artistry, so embrace it as a canvas for your creativity.
Tools of the Trade: The choice of coloring tools can significantly influence the final result of your drawing. Watercolors offer a delicate and translucent finish, perfect for achieving soft and natural tones. Colored pencils provide precision and control, allowing you to layer colors and create intricate details. Markers, with their bold and vibrant pigments, are ideal for expressive and dramatic effects. Select the medium that aligns with your artistic vision and comfort level. Remember to invest in quality materials, as they can make a substantial difference in the richness and longevity of your colors.
Blending and Layering: The secret to achieving depth and dimension in your colored drawing lies in the art of blending and layering. Start with a base layer of color, applying it evenly to the desired areas. Then, gradually build up layers by adding more colors or adjusting the intensity of your strokes. Blending can be done with specialized blending tools or simply by using the same pencils or brushes with varying pressure. Pay attention to transitions between colors, ensuring they flow smoothly and realistically. For added texture and depth, use techniques like stippling or cross-hatching to create unique visual effects.
Coloring: Realism or Artistry
The choice to color your sparrow drawing is a creative decision that shapes your artwork’s character. Whether you lean towards capturing the natural hues of the sparrow or prefer an artistic exploration of colors, Step 8 offers a canvas for your imagination.
The Palette of Possibilities
Your choice of coloring tools can unlock a world of possibilities. Watercolors, colored pencils, and markers each have their unique attributes, allowing you to express your artistic vision with precision and flair.
Blending and Layering Mastery
Blending and layering are the keys to transforming a flat drawing into a multidimensional masterpiece. Embrace these techniques to infuse depth, texture, and realism into your colored sparrow. Whether you choose the path of realism or artistry, Step 8 opens the door to a world of creative expression through color.
In Step 8, you hold the palette, and the canvas of your sparrow drawing awaits your artistic brushstrokes. Whether you choose to stay true to nature’s hues or embark on a journey of imaginative colors, let your creativity soar. Coloring, while optional, can be the crowning glory of your sparrow drawing—a testament to your artistic prowess and a vibrant celebration of this remarkable bird.
Related questions and answers
- What are the basic materials needed for drawing a sparrow?
To embark on the artistic journey of drawing a sparrow, you’ll need a few basic materials to bring your avian creation to life. These essential tools include:
Paper: A quality drawing paper or sketchbook provides a suitable canvas for your sparrow artwork. Opt for a heavier weight paper to prevent ink or pencil marks from bleeding through.
Pencil: A set of drawing pencils with varying levels of hardness (ranging from 2H for lighter lines to 6B for darker shading) allows for precise detailing and shading in your drawing.
Eraser: An eraser, preferably a kneaded eraser, helps you correct mistakes and refine details without damaging the paper.
Reference Images: Sparrow photographs or illustrations serve as visual references, guiding you in capturing the bird’s unique features and proportions accurately.
These fundamental materials provide the foundation for your sparrow drawing. Depending on your artistic preferences, you may also choose to explore coloring tools like watercolors, colored pencils, or markers in the later stages of your artwork.
- How can I draw a sparrow that looks realistic?
Creating a realistic sparrow illustration demands attention to detail and a focus on capturing the bird’s distinctive characteristics. Here’s a concise guide to achieving a lifelike sparrow drawing:
Reference Images: Begin by gathering high-quality reference images of sparrows. These visuals provide crucial insights into their plumage patterns, body proportions, and coloration.
Basic Outline: Start with a simple oval for the body and a smaller one for the head. Pay careful attention to proportion; sparrows have a compact body with a round head.
Wings and Tail: Draw the wings using curved lines, emphasizing their distinctive shape. Sparrows have short, pointed wings. The tail should be short and slightly notched.
Eyes and Beak: Detail the eyes with precision, noting their size and placement. The beak should be conical and slender, accurately representing the sparrow’s distinctive feature.
Feathers and Details: Add feather-like textures to the body, focusing on the markings specific to the sparrow species you’re portraying. Patience and precision are key to achieving realism.
Legs and Feet: Draw the legs with tiny claws, positioning them naturally as if perched on a branch. Pay attention to leg thickness and proportions.
Branch or Perch: If desired, include a branch or perch. Add bark texture and thickness for realism and position the bird naturally on it.
Coloring (Optional): For added realism, carefully select and apply colors that match the sparrow species. Blend and layer colors to achieve depth and texture.
Practice: Realism comes with practice. Don’t be discouraged by initial attempts; keep refining your techniques and observing sparrows in the wild for inspiration.
By following these steps and continuously honing your skills, you can create a sparrow drawing that captures the essence of this beloved bird in exquisite detail.
- Are there any shortcuts for drawing a sparrow’s feathers?
While there are no true shortcuts for achieving realistic sparrow feathers in your drawings, some techniques can simplify the process.
Stippling: Instead of meticulously drawing each feather, consider using stippling, a method of creating texture with small dots. It’s effective for achieving a feathered look.
Layering: Start with broad strokes to establish the bird’s overall shape. Then, layer finer details, including feathers, in a systematic manner. This approach adds depth and realism.
Reference Images: Study reference images of sparrows to understand how their feathers are arranged and the patterns they exhibit. This helps you replicate their appearance more accurately.
Practice: Like any skill, drawing feathers improves with practice. Dedicate time to sketching sparrows and their feathers regularly to refine your technique.
Patience: Detailing feathers requires patience. Take your time, and don’t rush the process. The more meticulous you are, the more realistic your feathered friend will appear on paper.
While shortcuts may offer some assistance, honing your feather-drawing skills through practice and attention to detail remains the most effective path to achieving lifelike sparrow feathers in your artwork.
- What’s the best way to draw a sparrow’s distinctive markings?
To capture a sparrow’s distinctive markings accurately, follow these steps:
Reference Images: Begin by studying high-quality reference images of sparrows. These visuals provide crucial insights into their unique markings.
Pencil Sketch: Start with a light pencil sketch of the bird’s body, focusing on the overall shape and proportions.
Marking Placement: Carefully observe the sparrow’s markings, noting their size, shape, and positioning on the body. Pay attention to patterns on the wings, head, and back.
Light Lines: Use light, fine lines to draw the markings, ensuring they match the bird’s natural patterns. Sparrows often have streaks, spots, or distinct lines.
Shading: Add shading to create depth and texture within the markings. Sparrow markings can vary in color, so choose appropriate shades to mimic their appearance.
Blend and Detail: Blend colors and add finer details to make the markings appear more realistic. Feathered edges and subtle transitions enhance authenticity.
Patience: Achieving accurate markings requires patience and precision. Take your time, and don’t rush the process.
By following these steps and continuously refining your technique through practice, you can master the art of drawing a sparrow’s distinctive markings, bringing authenticity and charm to your artwork.
- Can I use digital tools to draw a sparrow?
Absolutely, you can use digital tools to draw a sparrow. In fact, digital drawing offers several advantages, such as undo/redo functions, a wide range of colors, and precise detailing options. Here’s how to get started:
Choose a Digital Platform: Select a digital drawing platform or software that suits your preferences and skill level. Popular options include Adobe Photoshop, Procreate, or free alternatives like GIMP and Krita.
Hardware: Invest in a graphic tablet or stylus that works seamlessly with your chosen software. These tools offer greater control and mimic the feel of traditional drawing.
Reference Images: Gather high-quality reference images of sparrows to guide your digital drawing. Import these into your digital workspace.
Sketch and Outline: Begin with a rough sketch of the sparrow’s body and markings. Use digital brushes to create a detailed outline.
Color and Detail: Apply colors and textures with digital brushes, experimenting with different opacities and brush settings to achieve realistic effects.
Layers: Utilize layers to separate elements of your drawing, making it easier to edit and refine specific areas.
Zoom and Precision: Take advantage of zoom functions for precise detailing, ensuring you capture the sparrow’s distinctive features accurately.
Practice: As with traditional drawing, practice is key to mastering digital techniques. Experiment with various tools and settings to enhance your skills.
Digital tools provide a versatile and accessible way to create stunning sparrow illustrations, offering flexibility and opportunities for endless creativity.
- What are some common mistakes to avoid when drawing sparrows?
When drawing sparrows, there are several common mistakes to avoid to ensure a more accurate and pleasing depiction:
Proportion Errors: Incorrect proportions can distort the appearance of the sparrow. Pay attention to the size and placement of body parts like the head, wings, and tail.
Overcomplicating Details: While capturing details is important, overcomplicating them can lead to a cluttered and confusing drawing. Simplify intricate markings and textures.
Neglecting Anatomy: Sparrows have distinct body shapes. Neglecting their anatomy can result in an inaccurate portrayal. Study their anatomy, especially the beak, legs, and wings.
Lack of Reference: Drawing from memory can lead to inaccuracies. Always use reference images to guide your drawing and ensure realism.
Poor Shading and Texturing: Inadequate shading and texturing can make the drawing appear flat. Use shading techniques to add depth and texture to feathers and markings.
Rushing the Process: Patience is essential. Rushing through a drawing can lead to mistakes. Take your time to refine details and achieve a more polished result.
Ignoring Light Source: Neglecting the direction of light can make the drawing inconsistent. Determine the light source and shade accordingly for a more realistic look.
Inconsistent Line Work: Maintain consistency in your line work, especially when depicting the bird’s feathers and markings. Irregular lines can disrupt the overall harmony of the drawing.
By avoiding these common mistakes and practicing regularly, you can improve your sparrow drawings and create more accurate and appealing representations of these beautiful birds.
- Are there any famous sparrow drawings I can use as inspiration?
Certainly, there are renowned sparrow drawings that can serve as inspiration for your own artwork. One notable example is John James Audubon’s “Eastern Towhee.” While not a sparrow in the strictest sense, this detailed and lifelike illustration of a bird showcases Audubon’s exceptional skill in capturing avian beauty.
Another source of inspiration is David Sibley’s “Sibley Guide to Birds.” Sibley’s comprehensive collection of bird illustrations includes various sparrows, each meticulously rendered with attention to detail, plumage, and markings.
For a more artistic take, consider the work of wildlife artist Robert Bateman, who often features sparrows in his paintings. His ability to convey the essence and character of these birds in a realistic yet artistic style can provide valuable insights into capturing the spirit of sparrows in your drawings.
Exploring these renowned artists’ works can offer valuable inspiration and insights into depicting sparrows with both accuracy and artistic flair in your own creations.
- What other bird species can I learn to draw?
There is a wide array of bird species you can learn to draw, each offering its own unique challenges and artistic opportunities. Some popular options include:
Robins: Known for their distinctive red breast, robins make an excellent subject for beginners due to their relatively simple shapes and striking coloration.
Owls: With their captivating eyes and intricate feathers, owls provide a captivating subject for artists interested in mastering texture and detail.
Hawks and Eagles: These majestic birds of prey offer opportunities to explore intricate wing patterns and sharp, predatory features.
Waterfowl: Ducks, swans, and geese showcase the beauty of aquatic birds, with various species exhibiting diverse plumage and graceful forms.
Songbirds: Beyond sparrows, songbirds like blue jays, cardinals, and finches offer opportunities to capture vibrant colors and melodious personalities.
Exotic Birds: For advanced artists, challenging subjects like parrots, toucans, and hummingbirds provide a chance to experiment with brilliant colors and intricate shapes.
Choosing which bird species to draw depends on your skill level and personal preferences. Exploring different avian subjects can be both a rewarding artistic journey and an opportunity to hone your drawing skills.
TLDR
Drawing a sparrow step by step allows you to gain a deeper understanding of nature through art. By following the instructions provided, you can make a beautiful rendition of this charming bird. Practice makes perfect, and with each drawing, you’ll improve your skills and broaden your understanding of the world of art.
Don’t be afraid to experiment with different drawing techniques if you want to improve your drawing abilities. By observing and experimenting with other bird species and wildlife, you can broaden your horizons. Every stroke of your pencil or brush will help you improve your skills as an artist.
As a result, you can embrace your inner artist and let your creativity run wild. If you want to be relaxed, express yourself, or simply enjoy creating something beautiful, drawing a sparrow can be a great way to do just that. It’s important to keep your artistic talent alive and to be inspired by it.
Amhil Khan, a dedicated nature enthusiast and the founder of BirdsOfTheWild.com, is a passionate advocate for the captivating world of avian wonders. With a deep-seated curiosity about the intricate lives of birds, Amhil’s journey began as a fascination and has evolved into a mission to inspire others to appreciate and protect these magnificent creatures.
Amhil’s love for birds led to the creation of Birds of the Wild, a platform where his expertise in ornithology, coupled with his captivating storytelling, provides readers with an immersive and educational experience. Through his lens and words, he captures the essence of birds in their natural habitats, offering a glimpse into their behaviors, migrations, and the ecosystems they inhabit.